UPDATES AND ALERTS

* Grab your scrapbook quotes at the bottom of the page and sign my guestbook while you're down there!

* I have posted a gallery of layouts. If you made a layout with one of my kits post it there for the world to see!

I have learned so much from people giving away advice, help and encouragemnet as well as free scrapbook kits. I love giving back in honor of all of the generous people out there who have taught me so much. If you love using my free scrapbook creations and would like to make a donation in support of my blog and work, please follow this link below! Any donations are appreciated and welcomed. Any donor will get a special freebie designed as per your request! Thank you so much for visiting my blog as YOU make this all possible.

Showing posts with label tutorial. Show all posts

Wednesday, April 29, 2009

New Scrapbookers Helper

I discovered a new website today and it is a fantastic little helper!
I know, when I am doing a scrapbook page, I often am overwhelmed by the colors out there. Which will look best with my picture? Does pink and red go together? This ribbon looks okay but is it the right color?

NEVER FEAR
Color help is here.


Scrap By Color is a great new site to help you with your palate woes. Just upload the picture you want to scrap and it will compile a color palate for you. It provides you with 20 colors that look nice with your picture. If you see one that suits your mood, click it and on the right side of the screen it will show you monochrome, complimentary, triadic, analogous, and split comp. color suggestions.
This is a miracle site and a lot of fun to play with. I am sure we will all be chosing better colors now for our scrapbook pages...spread the beauty!

Thursday, February 26, 2009

Pocket Picture Book Tutorial

Here is a great way to make a picture book from your own computer to pop into your back pocket. Now you really can take family everywhere you go!
Just place your pictures on the template as instructed.
Then, cut and fold the paper into the book as per the instructions. The template is 8.5 x11

Monday, February 23, 2009

How did you do that?

Here is another tutorial for you!
You can make these cute wooden shapes for your page. Make an alphabet, wordart, a frame, or whatever you want!
This tutorial will be in paint.net but you can use photoshop and get the same effect.
Here is a frog and a fairy for you that I made so you can see what the final project will look like. To use these two wood blocks just click the image, right click and save as a .png file!

Prepare:
  • open an object in paint.net. It should be a solid colored object.
  • duplicate the layer so you have two layers with the same object.
  • make sure you have downloaded and installed the bevel, jitter, motion blur, and outline plug-ins from the paint.net forum.
On the bottom layer: (base)
3. outline the object with a neutral brown color for wood or a silver color for brushed metal. You can outline the same shape or do a circle or square around the object. This will be your wooden base.
4. Add noise to the wooden base
5. Select the image and add motion blur at an angle. You want to specifically select the wooden base so when you apply the motion blur the base will stay the same shape.
6. Bevel the bottom layer using the bevel plug-in

On the top layer: (paint)
7. add noise to the object then add motion blur like you did above.
8. To get the faded or scratched paint effect use the jitter plug-in (menu: effects, distort, jitter). Play with it until you are happy with the look.
9. bevel the top layer


I hope this was helpful.

THANKS!

Wednesday, February 11, 2009

Tutorials

This site was brought to my attention.
There are a bazillion and a half tutorials for people using photoshop to scrapbook. Take a look around! This blog has some great stuff in it too! Click the banner below to go directly to the site!


The owner of this blog was kind enough to present me with a blog award, the Lemonade Blog Award.
...and now, i will pass this award to my blog nominees.

The "rules" of this award are:
1. Put the logo on your blog or post. (Right click on the logo and save to your own computer.)
2. Nominate at least 10 blogs which show great attitude and/or gratitude!3. Link to your nominees within your post.
4. Let them know that they have received this award by commenting on their blog.
5. Share the love and link to this post with the person from whom you received your award.Here are my nominees:

I will post the nominees later, after I pass the bar exam...

Wednesday, January 28, 2009

Shape Templates

I had a few people ask me for shapes that can be used with the glitter tutorial below. Here are a few for you. Just save them as .png files and you shouldn't have a problem!
Thanks!

Monday, January 26, 2009

Glitter Tutorial

Ever wonder how people make those lovely glitter images for their pages? I did so I investigated and made the following tutorial for you. I use paint.net so the tutorial is done in that program. The program is free and you can download all the plug-ins you need to make this program work like magic! Even if you do not use paint.net, most of the other photo editing spftware have simillar commands, just located in different places.

Make sure you have the tools:
1. download the following plug-ins: "frosted glass", "crystalize", and "sharpening"
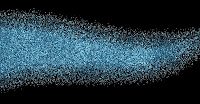
2. Get a sheet of glittery paper. You con download any number of glitter squares if you search on google or digiscrapdepot.com

Tutorial:
1. Open your glitter sheet in paint.net
(If you don't have a glitter sheet then open up the image and "add noise" colored or black and white, this will give you the variation of light and dark that will be the reflective glitters)

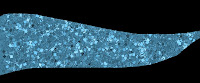
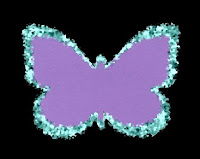
2. select the shape you want the glitter embellishment to be (butterfly or flower or nike swoosh...just do it!)

3. Now you have your shape cut out of the glitter sheet

4. On the effects menu under distort, select frosted glass. Tweak the settings until you have a spray of color you like.

5. On the effects menu under distort select crystalize. You want to keep the settings low on this. Crystalize at a 1 or 2.

6. on the effects menu under photo select sharpening. Tweak this until you are happy with the colors.

7. Adjust the brightness and contrast or play with luminosity curves, if your more advanced, to get it just the way you want it!

(Other program note: you can achieve frosted glass effect by blurring the image and "add noise". Make sure color saturation is at zero. You can have the noise to be black and white or color. Then, move onto the crystalize step. Or, you can customize your glitter by using brushes. There are all sorts of glitter brushes for photoshop that are out there and free!)

Once you master this, you can make borders and edge things in glitter. Play with it! I hope this was helpful!

WOW! Glitter-riffic!
Here are the before and after pictures!